# cos-js-sdk-v5
腾讯云 COS JS SDK([XML API](https://cloud.tencent.com/document/product/436/7751))
[releases and changelog](https://github.com/tencentyun/cos-js-sdk-v5/releases)
## Get started
### 一、前期准备
1. 首先,JS SDK 需要浏览器支持基本的 HTML5 特性,以便支持 ajax 上传文件和计算文件 md5 值。
2. 到 [COS对象存储控制台](https://console.cloud.tencent.com/cos) 创建存储桶,得到 Bucket(由bucketname-appid 组成,appid必须填入) 和 [Region(地域名称)](https://cloud.tencent.com/document/product/436/6224)
3. 到 [控制台密钥管理](https://console.cloud.tencent.com/capi) 获取您的项目 SecretId 和 SecretKey
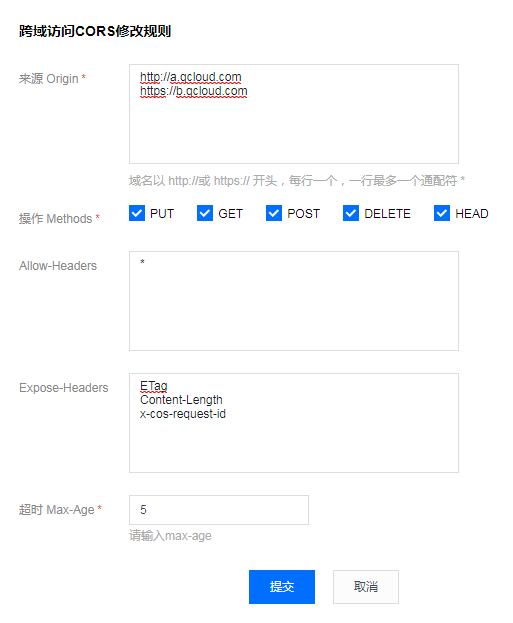
4. 配置 CORS 规则,配置例子如下图:
### 二、计算签名
由于签名计算放在前端会暴露 SecretId 和 SecretKey,我们把签名计算过程放在后端实现,前端通过 ajax 向后端获取签名结果,正式部署时请在后端加一层自己网站本身的权限检验。
这里提供 [PHP 和 NodeJS 的签名例子](https://github.com/tencentyun/cos-js-sdk-v5/blob/master/server/),其他语言,请参照对应的 [XML SDK](https://cloud.tencent.com/document/product/436/6474)
### 三、上传例子
1. 创建 test.html,填入下面的代码,修改里面的 Bucket 和 Region。
2. 部署好后端的签名服务,并修改 getAuthorization 里的签名服务地址
3. 把 test.html 放在 Web 服务器下,然后在浏览器访问页面,测试文件上传
```html
<input id="file-selector" type="file">
<script src="dist/cos-js-sdk-v5.min.js"></script>
<script>
// 存储桶名称,由bucketname-appid 组成,appid必须填入,可以在COS控制台查看存储桶名称。 https://console.cloud.tencent.com/cos5/bucket
var Bucket = 'test-1250000000';
// 存储桶Region可以在COS控制台指定存储桶的概览页查看 https://console.cloud.tencent.com/cos5/bucket/
// 关于地域的详情见 https://cloud.tencent.com/document/product/436/6224
var Region = 'ap-guangzhou';
// 初始化实例
var cos = new COS({
getAuthorization: function (options, callback) {
var url = '../server/sts.php'; // 这里替换成您的服务接口地址
var xhr = new XMLHttpRequest();
xhr.open('GET', url, true);
xhr.onload = function (e) {
try {
var data = JSON.parse(e.target.responseText);
var credentials = data.credentials;
} catch (e) {
}
if (!data || !credentials) return console.error('credentials invalid');
callback({
TmpSecretId: credentials.tmpSecretId,
TmpSecretKey: credentials.tmpSecretKey,
XCosSecurityToken: credentials.sessionToken,
StartTime: data.startTime, // 时间戳,单位秒,如:1580000000,建议返回服务器时间作为签名的开始时间,避免用户浏览器本地时间偏差过大导致签名错误
ExpiredTime: data.expiredTime, // 时间戳,单位秒,如:1580000900
});
};
xhr.send();
}
});
// 监听选文件
document.getElementById('file-selector').onchange = function () {
var file = this.files[0];
if (!file) return;
// 分片上传文件
cos.sliceUploadFile({
Bucket: Bucket,
Region: Region,
Key: file.name,
Body: file,
onHashProgress: function (progressData) {
console.log('校验中', JSON.stringify(progressData));
},
onProgress: function (progressData) {
console.log('上传中', JSON.stringify(progressData));
},
}, function (err, data) {
console.log(err, data);
});
};
</script>
```
## webpack 引入方式
支持 webpack 打包的场景,可以用 npm 引入作为模块
```shell
npm i cos-js-sdk-v5 --save
```
## Start Demo
```
1. git clone cos-js-sdk-v5 至本地
2. cd cos-js-sdk-v5
3. 修改 server 文件夹中 sts.js 或 sts.php 中的 secretId、secretKey、bucket、region 配置
4. npm run server # 用 node 启动服务
5. 浏览器输入 http://127.0.0.1:3000/ 即可进行 demo 演示
```
## 说明文档
[使用例子](demo/demo.js)
[快速入门](https://cloud.tencent.com/document/product/436/11459)
[接口文档](https://cloud.tencent.com/document/product/436/12260)